
Dig This!

Ah, fall. Prime time to divide perennials, transplant trees and shrubs, spread mulch and prepare garden beds. I dig in, literally, itching to get my chore list whittled down. Too soon, I remember that these labor-intensive activities lead to achy, over-extended muscles and a back that won't straighten. But I vow this fall will be different. Thanks to Bob Denman of Red Pig Garden Tools, I will dig smarter, not harder, armed with knowledge to discern the hallmarks of a quality shovel, how to use it correctly and maintain it. If you, too, suffer from misguided but well-intentioned gardening adventures, read on.
Quality tools last longer when treated well.
|
First, start with the right tool. A shovel with a pointed, cupped blade is the most popular, versatile choice, suitable for the majority of digging tasks. The narrow tip focuses the digger's weight, increasing pounds per square inch and giving extra oomph to your efforts. However, for turning and preparing a garden bed, opt for a straight-edged, almost flat bladed spade. The latter is also useful for cutting through roots.
Next, consider the blade size. Bigger is not always better. Larger blades translate to fewer shovel strokes, but it's only a bonus if you are physically able to heft what the blade can hold and maintain the activity without injury or rapid exhaustion. In addition, a small-bladed shovel is the smarter choice for dense, rocky soils. Narrow bladed shovels, sometimes referred to as trenching shovels, make quick work of transplanting shrubs and perennials with minimal root disturbance to other plants.
Blade construction and material are your next criteria. Forged steel blades, made by heating metal to an almost molten stage and then hammering it into shape, are denser than stamped blades and thus are less likely to bend or break. Forged steel comes in either conventional carbon steel blades or highly polished stainless steel. Carbon steel will rust; stainless steel won't. However, carbon steel blades are more easily sharpened (a sharp blade speeds digging) and are less brittle, making them less likely to fracture with improper use.
Blade thickness is another indicator of quality and durability. Check thickness at the forward-rolled foot tread (where you rest your foot) and the socket (where the blade attaches to the handle). These areas bear the greatest stress loads. A long socket, welded closed, with a shallow extension into the blade can withstand heavy use and stresses. The blade angle should be such that the shovel aims straight down, when placed as close to your feet as comfortable, with the handle extended at arm's length in front of you.
Handle length, style, material and blade attachment are the last items on your checklist. I prefer straight, long-handled shovels because they give me more hand position flexibility, which prevents me from bending over too much, too often. However, when gardening in tight quarters, I opt for D-handled tools; they offer greater maneuverability because of their shorter length. Bob recommends selecting a shovel whose handle is chest high when the blade is buried up to its treads.

Because I have broken more than my share of wooden handles (I've also bent a shovel blade), I have drifted to graphite handles of late. Bob convinced me to try a wooden handled shovel again. I was skeptical at first until he pointed out that wooden handles vary in quality as much as shovel blades. Wood handles should be straight-grained and knot-free and attached by a rivet – two is better – that passes all the way through the handle. In addition, handles that are thicker where they meet the socket will provide additional strength at this stress point.
Thanks to Bob, I'm now the proud owner of a Corona wooden-handled transplanting shovel. Digging will be such a pleasure…well, perhaps not, but it will be easier now that I possess a great tool and the wisdom to use it well.
The Right Way To Dig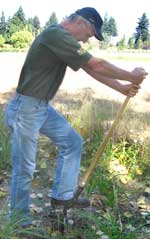 Step 1 - Position the shovel with the blade straight down, as close to your feet as comfortable, and the handle in front of you with your arms fully extended and elbows straight. This allows you to use the force of gravity along with your weight and strength. 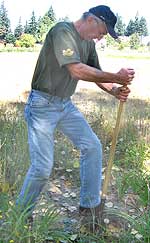 Step 2 - Place your foot on the shovel's tread. Shifting your weight to that foot, drive the blade to its full depth (up to the tread). 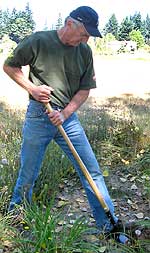 Step 3 - Step back and, while keeping your back straight, pull the handle towards your chest or shoulder. 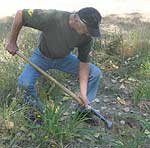 Step 4 - Bend your knees, lower your body and slide your bottom hand down the handle as far as you can comfortably manage. Continue to keep your back straight. 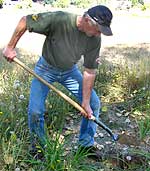 Step 5 - Lift the shovel, relying on the strength of your legs, not your back. 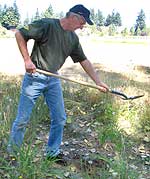 Step 6 - Keep the shovel close to your body (do not extend your arms) and, with a jerking motion, unload the blade. It is easiest on your back to toss the soil directly ahead. If you need to toss it to the side, rotate your torso as you rise (Step 5) so that you are pointed towards where you will toss it.
Like a demure lady, take small bites of soil. Remove no more than a 2 to 3 inch thick slice of soil with each shovel stroke. Not only is the soil easier to dig in smaller chunks, but you will tire less quickly.
|
Sources:
Red Pig Garden Tools
12040 S. E. Revenue Road
Boring, OR 97009
Phone: 503-663-9404
Written and photographed by Lisa Albert

Gardening for the Homebrewer: Grow and Process Plants for Making Beer, Wine, Gruit, Cider, Perry, and More
By co-authors Debbie Teashon (Rainy Side Gardeners) and Wendy Tweton
Copyright Notice | Home | Search | Archives